"Lung linh bóng nước con đò, Nhớ sao Chợ Mới câu hò thủy chung
Quê tôi miền đất anh hùng, Hôm nay vẫn đẹp vô cùng ai ơi!"

"Giờ thăm lại trường xưa trong khoảnh khắc
Cảnh còn đây người đi mất từ lâu..."

"對我而言台灣留下非常深刻的印象,我所去的每一個地方,我所見過的每一個人,這都是緣分!
再見大家,再見台灣!"

A greeting from Vietnam.

Showing posts with label Tinhoc. Show all posts

Saturday, January 20, 2018

[Clip tự làm] Tập tành kỹ xảo phim

Footage Gao Ranger:

Footage Tây Du Ký bản nhái (Monkey King by me):

(Nguyễn Mỹ - 2/2016)

Arduino Robot

Obstacle Avoidance Robot:

  • Arduino UNO R3
  • Adafruit Motor Shield
  • HC-SR04 Ultrasonic Sensor
  • Holder for HC-SR04
  • Tower Pro SG90 RC Mini Servo Motor
  • DC Motor & Wheel


Demo from CTU C40 students:

Tuesday, December 22, 2015

How to completely remove Oracle in Windows

In the past I've had many problems uninstalling all Oracle products from Windows systems. Here's my last resort method:

  • Uninstall all Oracle components using the Oracle Universal Installer (OUI).
  • Run regedit.exe and delete the HKEY_LOCAL_MACHINE/SOFTWARE/Oracle key. This contains registry entires for all Oracle products.
  • If you are running 64-bit Windows, you should also delete the HKEY_LOCAL_MACHINE/SOFTWARE/Wow6432Node/Oracle key if it exists.
  • Delete any references to Oracle services left behind in the following part of the registry (HKEY_LOCAL_MACHINE/SYSTEM/CurrentControlSet/Services/Ora*). It should be pretty obvious which ones relate to Oracle.
  • Reboot your machine.
  • Delete the "C:\Oracle" directory, or whatever directory is your ORACLE_BASE.
  • Delete the "C:\Program Files\Oracle" directory.
  • If you are running 64-bit Wiindows, you should also delete the "C:\Program Files (x86)\Oracle" directory.
  • Remove any Oracle-related subdirectories from the "C:\ProgramData\Microsoft\Windows\Start Menu\Programs\" directory.
  • Empty the contents of your "C:\temp" directory.
  • Empty your recycle bin.

At this point your machine will be as clean of Oracle components as it can be without a complete OS reinstall.

Remember, manually editing your registry can be very destructive and force an OS reinstall so only do it as a last resort.

If some DLLs can't be deleted, try renaming them, the after a reboot delete them.

(Source: https://oracle-base.com/articles/misc/manual-oracle-uninstall)

Tuesday, June 23, 2015

libsvm - How to use?

libsvm is a popular library for performing Support Vector Machine algorithm. This library is developed by Chih-Chung Chang and Chih-Jen Lin, professor at National Taiwan University. Next, I will show you how to install the libsvm in MATLAB.

1. Installation

Monday, June 22, 2015

Useful chunks of MATLAB code

1. Nominal to numeric mapping

The following code will convert from a nominal value vector to a numeric value vector.
Example: suppose that Yno is the nominal value vector and Ynum is the numeric value vector. The casting line is as follow:
Ynum = double(nominal(Yno));

2. Sum one field of a struct

The following code will compute the summation from the field "true" of a struct called "recall".
result=sum(cell2mat({recall.true}));
(Nguyen My - 2015/06/23)

Monday, June 15, 2015

Convert struct of single-value fields into a 2D matrix

Suppose that we have a dataset of N records, each records is a struct of M fields, and each field has just a single numeric value. Now, we want to convert this struct-type dataset into a matrix for further manipulation. What should we do? The following figure will tell you the way:
 Following is the brief description for functions used:
  • struct2cell(): converts the m-by-n structure s (with p fields) into a p-by-m-by-n cell array c.
  • B=squeeze(A): returns an array B with the same elements as A, but with all singleton dimensions removed.
And here is the sample MATLAB code:
Xstruct = importdata([getCurrentFolder() '\..\data\somename.mat']);
Xcell=struct2cell(Xstruct);
X=squeeze(Xcell)';
X=cell2mat(X);
Thank for reading!
(Nguyen My - 2015/06/16)

Sunday, April 19, 2015

Useful chunks of MATLAB code for file/folder manipulation

1. Read all file names inside a range of folders

The following code will look into folders, with regarding to the folder name pattern, and read all file names inside the dedicated folder.
Example: Data files are collected from many user, and each user has it own folder with the name u001, u002,...These user folders belong to a root folder (as in the following photo).
The MATLAB code to read all data file names in this case is:

fileCfg=struct(...
            'rootFolder','D:\Experiment\BodyDyn',...
            'userFolderPattern','^u\d+$',... %regular expression for user folder names
            'extension','set'); %File extension filter
userf = dir(fileCfg.rootFolder);
userf = regexpi({userf.name},fileCfg.userFolderPattern,'match');
userf = [userf{:}];
%userf is now a row matrix that holds all user folder names

dataFiles=[];
for i=1:size(userf,2)
    temp=char(strcat(fileCfg.rootFolder,'\',userf(i),'\*.',fileCfg.extension)); %full path to data folder
    temp2 = (dir(temp)); %this will cause error if the file date is empty
    temp2 = { temp2.name };
    dataFiles=[dataFiles; temp2'];
    %dataFiles is now a vector that holds all file names
end
Important functions that you may need to understand: dir (list folder contents), regexpi (match regular expression with case insensitive).

2. Save results to file

In the following code, it will generate the file that packs the variables varX and varY. This file will be saved in the same folder of the current M file.

fileFullPath=mfilename('fullpath');
temp=strsplit(fileFullPath,'\'); %decompose the fullpath into folder parts and file name part
temp(end)=[]; %remove file name part
temp=strjoin(temp,'\'); %temp is now the path to the folder of current M file
filepath=strcat(temp, '\', datestr(now,'yyyymmdd_HHMM'), '_myData.mat');
save(char(filepath),'varX', 'varY'); %save file with timestamp
disp(['File is saved to: ' filepath]);
(Nguyen My - 2015/04/20)

Friday, April 17, 2015

A geometric interpretation of the covariance matrix

Introduction

In this article, we provide an intuitive, geometric interpretation of the covariance matrix, by exploring the relation between linear transformations and the resulting data covariance. Most textbooks explain the shape of data based on the concept of covariance matrices. Instead, we take a backwards approach and explain the concept of covariance matrices based on the shape of data.
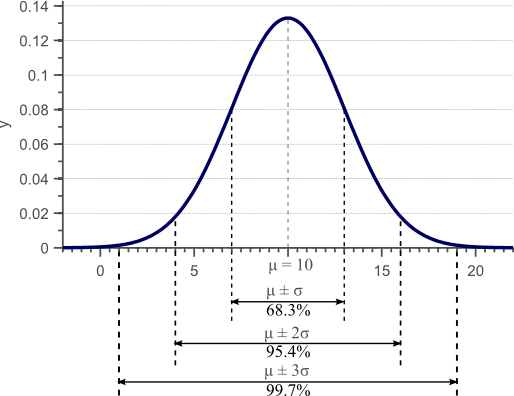
In a previous article, we discussed the concept of variance, and provided a derivation and proof of the well known formula to estimate the sample variance. Figure 1 was used in this article to show that the standard deviation, as the square root of the variance, provides a measure of how much the data is spread across the feature space.
Normal distribution
Figure 1. Gaussian density function. For normally distributed data, 68% of the samples fall within the interval defined by the mean plus and minus the standard deviation.
We showed that an unbiased estimator of the sample variance can be obtained by:
(1)   \begin{align*} \sigma_x^2 &= \frac{1}{N-1} \sum_{i=1}^N (x_i - \mu)^2\\ &= \mathbb{E}[ (x - \mathbb{E}(x)) (x - \mathbb{E}(x))]\\ &= \sigma(x,x) \end{align*}

Thursday, September 19, 2013

ANDROID PROGRAMMING 2

1. Running your application
+ AndroidManifest.xml: describes the basic characteristics of the app. You should set the  android:targetSdkVersion as high as possible and test your app on the corresponding platform version.
+ src/: contains main source files.
+ res/: contains some sub-directories for app resources. Here are just a few:
        ++ drawable-hdpi/: for drawable objects that are designed for high-density (hdpi) screen.
        ++ layout/: for files that define your app's user interface.
        ++ values/: for other various XML files that contain a collection of resources, such as string and color definitions.

ANDROID PROGRAMMING 1

1. Some terminologies:
+ JRE (Java Runtime Environment): is basically the Java Virtual Machine, covers the need of running applications. It also includes browser plugins for Applet execution. 
+ JDK (Java Developper Kit): include JRE, compiler, debugger,... for creating and compiling programs. It is a subset of SDK. 
+ Eclipse: provides comprehensive facilities for software development in some languages.  
+ Android SDK: include API libraries and developper tools for creating, test and debug Android apps. 
+ ADT Bundle: include Eclipse and Android SDK. It helps streamline your Android app development. 
+ ADT Plugin: extends the capabilities of Eclipse to let you quickly set up new project, create an app UI, add packages based on Android framework API, debug and export .apk files.

Sunday, August 25, 2013

Some useful procedures for Oracle

1. Drop everything in a user tablespace:
BEGIN
   FOR cur_rec IN (SELECT object_name, object_type
                     FROM user_objects
                    WHERE object_type IN
                             ('TABLE',
                              'VIEW',
                              'PACKAGE',
                              'PROCEDURE',
                              'FUNCTION',
                              'SEQUENCE'
                             ))
   LOOP
      BEGIN
         IF cur_rec.object_type = 'TABLE'
         THEN
            EXECUTE IMMEDIATE    'DROP '
                              || cur_rec.object_type
                              || ' "'
                              || cur_rec.object_name
                              || '" CASCADE CONSTRAINTS';
         ELSE
            EXECUTE IMMEDIATE    'DROP '
                              || cur_rec.object_type
                              || ' "'
                              || cur_rec.object_name
                              || '"';
         END IF;
      EXCEPTION
         WHEN OTHERS
         THEN
            DBMS_OUTPUT.put_line (   'FAILED: DROP '
                                  || cur_rec.object_type
                                  || ' "'
                                  || cur_rec.object_name
                                  || '"'
                                 );
      END;
   END LOOP;
END;
2. Truncate all tables of the current user:
BEGIN
    FOR T in (SELECT table_name FROM user_tables) LOOP
      EXECUTE IMMEDIATE 'TRUNCATE TABLE '||T.table_name;
    END LOOP;

    FOR T in (SELECT table_name FROM user_tables) LOOP
      EXECUTE IMMEDIATE 'ALTER TABLE '||T.table_name||' ENABLE ALL CONSTRAINTS';
    END LOOP;
END;

Something about Oracle

1. Steps to connect to Oracle server using SQL Developer after installing:
1. Navigate to Configuration and Migration Tools, choose Database Configuration Assistant.
2. Create a database (be sure to remember the Global DB name or SID)
3. Create a Net Service Name in Net Configuration Assistant (Host Name is your PC name) to allow accessing the database across the network.
4. Create a Schema as sysdba: run {Oracle_dbhome}/bin/sqlplus.exe then type in the following commands:
User: sys as sysdba
Password: {leave empty}
create user sample_schema IDENTIFIED BY oracle_pass;
grant dba to sample_schema;
grant connect to sample_schema; 
5. Open SQL Developer (client).
6. Create a connection with non-sysdba role.

2. Import from dmp file:
1. Open cmd.
2. Run "imp file=.dmp show=y" to view the user who exported the dump file (source user).
3. Execute the following command:
imp scott/tiger@example file=<file>.dmp fromuser=<source> touser=<dest>
5. Open SQL Developer (client).
6. Create a connection with non-sysdba role.

3. So many system tables?
When you log in with SYSDBA users, there will be very many system tables you see. This may make you chaotic. But this problem can be solved by creating a new user and then log in again with that new created user!

4. Operations with DATE datatype
For inserting, use TO_DATE function according with date format specified in second parameter:
insert into TAIKHOAN(NGAYDANGKY)
values (TO_DATE('2013/08/25 21:02:44', 'yyyy/mm/dd hh24:mi:ss'));

For selecting, updating or deleting, use TO_CHAR to cast date value to string:
select TO_CHAR(NGAYSINH, 'dd/mm/yyyy') 
from SINHVIEN;

You are doing everything right by using a to_date and to_char function and specifying the time format. The trouble is just that when you select a column of DATE datatype from the database, the default format mask doesn't show the time. If you issue a
alter session set nls_date_format = 'dd/MON/yyyy hh24:mi:ss'
you will see that the time successfully made it into the database!

5. How to display UTF8 string in Oracle client?
You may face problems in displaying the same Unicode string in your web application and in Oracle client software (such as SQL Developper).

4.1. For web application configuration, you just add following tag to your HTML content:
<meta http-equiv="Content-Type" content="text/html; charset=utf-8" />

4.2. For Oracle client software, you need to know about NLS_LANG environment parameter. It sets the language and territory used by the client application and the database server. It also indicates the client’s character set, which corresponds to the character set for data to be entered or displayed by a client program.

The NLS_LANG parameter has three components: language, territory, and character set. Specify it in the following format, including the punctuation:
NLS_LANG = language_territory.charset 

Now, let's access Run dialog, press regedit to do something.
(Vào Run, gõ regedit, sao đó trỏ đến node registry như đường dẫn sau rồi đặt giá trị cho nó)
+ From the Registry Editor, you point to HKEY_LOCAL_MACHINE\SOFTWARE\ORACLE\KEY_OraDb11g_home1. 
+ Double click on NLS_LANG node. 
+ Set the value to AMERICAN_AMERICA.AL32UTF8.

Next, please restart your machine so that our change can take effect.

Okay, until now, maybe I put a stop for my minitut here. Thank you for reading it!
(Nguyen My)

Thursday, August 15, 2013

Install a Zend project

1. Copy the project source to www.
2. Copy Zend library to www.
3. Open httpd.conf and add these commands:
      NameVirtualHost *:80
      <VirtualHost *:80>
          ServerName btg
          DocumentRoot "C:\Program Files\EasyPHP-5.3.9\www\btg\public"
          SetEnv APPLICATION_ENV "development"
          <Directory "C:\Program Files\EasyPHP-5.3.9\www\btg\public">
              DirectoryIndex index.php
              AllowOverride All
              Order allow,deny
              Allow from all
          </Directory>
      </VirtualHost>

4. Open hosts file and add this command:
127.0.0.1       localhost btg
5. Open php.ini and modify the include_path:
            include_path = ".;${path}\php\includes;${path}\www\zend\library"
(replace btg and the url to yours!)

Tuesday, July 9, 2013

Inserting and Removing Table Row

To insert a row to table:
function themdong(idbang, iddongcu, iddongmoi, idocu, idomoi){
dongmoi=$('#'+idbang+' tr:last').clone();
dongmoi.appendTo('#'+idbang);

//modify new row's attribute: 
$('#'+idbang).find('tr:last').attr('id', function(index, id) {
return id.replace(iddongcu, iddongmoi);
});

//modify new cell's attribute: 
dongmoi.find('td').attr('id', function(index, id) {
return id.replace(idocu, idomoi);
});
}

To remove a row from table:

Tuesday, May 21, 2013

Left join vs. Natural join

An example:
SELECT p.MaPhieu, md.MaDV, p.MaCB, HoCB, TenCB, GhiChu, mp.MaMP, TenMP, DaNhapLieu, DATE_FORMAT( ThoiDiemTao,  '%d/%m/%Y %H:%i' ) AS TDTao, TenDP, TenTGTN, HoChuHo, TenChuHo
FROM phieu p
LEFT JOIN phieu_dp pdp ON ( p.MaPhieu = pdp.MaPhieu )
LEFT JOIN diaphuong dp ON ( pdp.MaDP = dp.MaDP )
LEFT JOIN phieu_tgtn ptg ON ( p.MaPhieu = ptg.MaPhieu )
LEFT JOIN tongiaotn tgtn ON ( ptg.MaTGTN = tgtn.MaTGTN )
LEFT JOIN phieu_ho pho ON ( p.MaPhieu = pho.MaPhieu )
LEFT JOIN ho ON ( pho.MaHo = ho.MaHo ) , mauphieu mp, mp_donviql md, canbo cb
WHERE p.MaMP = mp.MaMP
AND p.MaCB = cb.MaCB
AND mp.MaMP =  'MCX'
AND mp.MaMP = md.MaMP
AND md.MaDV =5
ORDER BY MaPhieu ASC 

Monday, May 20, 2013

Hiển thị 1 page khác lên tooltip

Để hiển thị thông tin từ 1 trang khác trong tooltip, ta làm như sau:
1) Download gói tooltip gồm 2 file: sticky.jssticky.css.
2) Nhúng 2 gói trên vào phần head của trang web.
<script src="tooltip/sticky.js"></script>
<link rel="stylesheet/css" href="tooltip/sticky.css">
3) Tạo hàm javascript hiển thị tooltip:

function showtooltip(trangxuly){
$('#sticky').html('<center>Loading...</center>');
$('#sticky').load(trangxuly);
}
4) Thêm thành phần có id là sticky vào trang HTML:

<div id="mystickytooltip" class="stickytooltip">
<div style="padding:5px">
<div id="sticky" style="width:350px; vertical-align:top; padding:0"><center><img src='/image/loading.gif'></center></div>
</div>
</div>

5) Gắn thuộc tính:
<a data-tooltip='sticky' onMouseOver='showtooltip("tinchitiet.php")'>Xem thông tin chi tiết</a>
Saturday, May 11, 2013

Hiển thị webcam và lưu ảnh về web server

Tut này sẽ hướng dẫn bạn các bước để hiển thị webcam trên web, sau đó lưu hình ảnh trên webcam về server có hỗ trợ PHP.
1. Download toàn gói demo tại đây, gói này gồm:
  • Thư mục jscam: chứa các file cần thiết nhất về hiển thị webcam.
  • File luuhinh.php: chứa hàm lưu hình ảnh về server.
  • File jquery.min.js: thư viện jQuery (nếu bạn có rồi thì thôi!).
  • File vidu.htm: code minh họa.
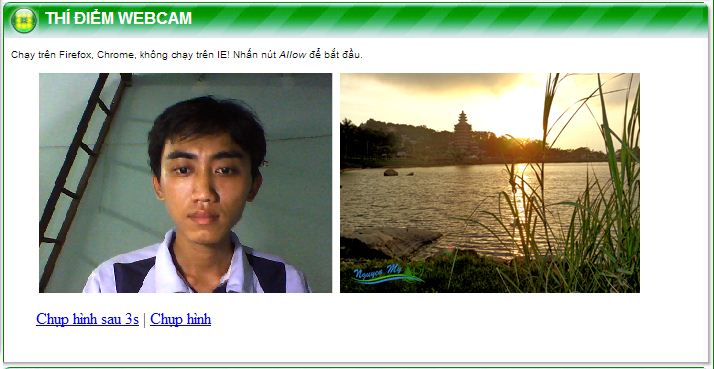
2. Giải nén gói demo trên vào nơi nào đó trong webroot. Sau đó chạy thử file vidu.htm để kiểm chứng. Kết quả như hình sau (demo online: http://nguyenmy.info/it/):
-------
Sau đây tui sẽ mô tả sơ lược về file vidu.htm:
  • File này sẽ có 2 dòng nhúng thư viện jscam và jquery (phải nhúng cả 2 thư viện vì trong jscam có dùng các hàm của jQuery):
<script src="jquery.min.js"></script>
<script type="text/javascript" src="jscam/jquery.webcam.min.js"></script>
  • Các thành phần HTML bắt buộc phải có và đặt đúng tên:
id="status": nơi hiện trạng thái của webcam (trong file ví dụ đã cho ẩn dòng này!).
id="webcam": nơi hiện webcam.
id="canvas" (đầy đủ là <canvas id="canvas" height="220" width="300"></canvas>): nơi hiện ảnh được chụp (cũng là ảnh sẽ được gửi về server).
  • Các hàm Javascript:
    • sifucam("#webcam", "canvas", "jscam"): khởi động webcam cho hiển thị ở #webcam, hình chụp cho hiển thị ở canvas, và đường dẫn tới thư mục jscam.
    • webcam.capture([n]): chụp ảnh từ webcam và vẽ lại bên canvas sau khoảng thời gian n giây (nếu n bị bỏ trống nghĩa là chụp liền).
    • sifucanvas('canvas', 'luuanh.php'): submit hình ảnh trong canvas về file luuanh.php để thực hiện lưu.
Để thực hiện được demo này, tác giả có kế thừa gói thư viện jscam và jquery của người khác (nước ngoài) để sửa chữa lại cho phù hợp.
Chúc các bạn thành công!
Nguyễn Mỹ