"Lung linh bóng nước con đò, Nhớ sao Chợ Mới câu hò thủy chung
Quê tôi miền đất anh hùng, Hôm nay vẫn đẹp vô cùng ai ơi!"

"Giờ thăm lại trường xưa trong khoảnh khắc
Cảnh còn đây người đi mất từ lâu..."

"對我而言台灣留下非常深刻的印象,我所去的每一個地方,我所見過的每一個人,這都是緣分!
再見大家,再見台灣!"

A greeting from Vietnam.

Showing posts with label Web. Show all posts

Sunday, August 25, 2013

Something about Oracle

1. Steps to connect to Oracle server using SQL Developer after installing:
1. Navigate to Configuration and Migration Tools, choose Database Configuration Assistant.
2. Create a database (be sure to remember the Global DB name or SID)
3. Create a Net Service Name in Net Configuration Assistant (Host Name is your PC name) to allow accessing the database across the network.
4. Create a Schema as sysdba: run {Oracle_dbhome}/bin/sqlplus.exe then type in the following commands:
User: sys as sysdba
Password: {leave empty}
create user sample_schema IDENTIFIED BY oracle_pass;
grant dba to sample_schema;
grant connect to sample_schema; 
5. Open SQL Developer (client).
6. Create a connection with non-sysdba role.

2. Import from dmp file:
1. Open cmd.
2. Run "imp file=.dmp show=y" to view the user who exported the dump file (source user).
3. Execute the following command:
imp scott/tiger@example file=<file>.dmp fromuser=<source> touser=<dest>
5. Open SQL Developer (client).
6. Create a connection with non-sysdba role.

3. So many system tables?
When you log in with SYSDBA users, there will be very many system tables you see. This may make you chaotic. But this problem can be solved by creating a new user and then log in again with that new created user!

4. Operations with DATE datatype
For inserting, use TO_DATE function according with date format specified in second parameter:
insert into TAIKHOAN(NGAYDANGKY)
values (TO_DATE('2013/08/25 21:02:44', 'yyyy/mm/dd hh24:mi:ss'));

For selecting, updating or deleting, use TO_CHAR to cast date value to string:
select TO_CHAR(NGAYSINH, 'dd/mm/yyyy') 
from SINHVIEN;

You are doing everything right by using a to_date and to_char function and specifying the time format. The trouble is just that when you select a column of DATE datatype from the database, the default format mask doesn't show the time. If you issue a
alter session set nls_date_format = 'dd/MON/yyyy hh24:mi:ss'
you will see that the time successfully made it into the database!

5. How to display UTF8 string in Oracle client?
You may face problems in displaying the same Unicode string in your web application and in Oracle client software (such as SQL Developper).

4.1. For web application configuration, you just add following tag to your HTML content:
<meta http-equiv="Content-Type" content="text/html; charset=utf-8" />

4.2. For Oracle client software, you need to know about NLS_LANG environment parameter. It sets the language and territory used by the client application and the database server. It also indicates the client’s character set, which corresponds to the character set for data to be entered or displayed by a client program.

The NLS_LANG parameter has three components: language, territory, and character set. Specify it in the following format, including the punctuation:
NLS_LANG = language_territory.charset 

Now, let's access Run dialog, press regedit to do something.
(Vào Run, gõ regedit, sao đó trỏ đến node registry như đường dẫn sau rồi đặt giá trị cho nó)
+ From the Registry Editor, you point to HKEY_LOCAL_MACHINE\SOFTWARE\ORACLE\KEY_OraDb11g_home1. 
+ Double click on NLS_LANG node. 
+ Set the value to AMERICAN_AMERICA.AL32UTF8.

Next, please restart your machine so that our change can take effect.

Okay, until now, maybe I put a stop for my minitut here. Thank you for reading it!
(Nguyen My)

Thursday, August 15, 2013

Install a Zend project

1. Copy the project source to www.
2. Copy Zend library to www.
3. Open httpd.conf and add these commands:
      NameVirtualHost *:80
      <VirtualHost *:80>
          ServerName btg
          DocumentRoot "C:\Program Files\EasyPHP-5.3.9\www\btg\public"
          SetEnv APPLICATION_ENV "development"
          <Directory "C:\Program Files\EasyPHP-5.3.9\www\btg\public">
              DirectoryIndex index.php
              AllowOverride All
              Order allow,deny
              Allow from all
          </Directory>
      </VirtualHost>

4. Open hosts file and add this command:
127.0.0.1       localhost btg
5. Open php.ini and modify the include_path:
            include_path = ".;${path}\php\includes;${path}\www\zend\library"
(replace btg and the url to yours!)

Tuesday, July 9, 2013

Inserting and Removing Table Row

To insert a row to table:
function themdong(idbang, iddongcu, iddongmoi, idocu, idomoi){
dongmoi=$('#'+idbang+' tr:last').clone();
dongmoi.appendTo('#'+idbang);

//modify new row's attribute: 
$('#'+idbang).find('tr:last').attr('id', function(index, id) {
return id.replace(iddongcu, iddongmoi);
});

//modify new cell's attribute: 
dongmoi.find('td').attr('id', function(index, id) {
return id.replace(idocu, idomoi);
});
}

To remove a row from table:

Thursday, May 30, 2013

Register and Remove a session in Zend

To register a session in Zend, you may use Zend_Session_Namespace class. And then, just assign value for your session variables:
$job = new Zend_Session_Namespace('application');
$job->username = 'test';
To remove username from the session just do :
unset($job->username);
To remove the whole 'application' namespace and asociated data you can use :
Zend_Session::namespaceUnset('application');

Tuesday, May 21, 2013

Left join vs. Natural join

An example:
SELECT p.MaPhieu, md.MaDV, p.MaCB, HoCB, TenCB, GhiChu, mp.MaMP, TenMP, DaNhapLieu, DATE_FORMAT( ThoiDiemTao,  '%d/%m/%Y %H:%i' ) AS TDTao, TenDP, TenTGTN, HoChuHo, TenChuHo
FROM phieu p
LEFT JOIN phieu_dp pdp ON ( p.MaPhieu = pdp.MaPhieu )
LEFT JOIN diaphuong dp ON ( pdp.MaDP = dp.MaDP )
LEFT JOIN phieu_tgtn ptg ON ( p.MaPhieu = ptg.MaPhieu )
LEFT JOIN tongiaotn tgtn ON ( ptg.MaTGTN = tgtn.MaTGTN )
LEFT JOIN phieu_ho pho ON ( p.MaPhieu = pho.MaPhieu )
LEFT JOIN ho ON ( pho.MaHo = ho.MaHo ) , mauphieu mp, mp_donviql md, canbo cb
WHERE p.MaMP = mp.MaMP
AND p.MaCB = cb.MaCB
AND mp.MaMP =  'MCX'
AND mp.MaMP = md.MaMP
AND md.MaDV =5
ORDER BY MaPhieu ASC 

Monday, May 20, 2013

Hiển thị 1 page khác lên tooltip

Để hiển thị thông tin từ 1 trang khác trong tooltip, ta làm như sau:
1) Download gói tooltip gồm 2 file: sticky.jssticky.css.
2) Nhúng 2 gói trên vào phần head của trang web.
<script src="tooltip/sticky.js"></script>
<link rel="stylesheet/css" href="tooltip/sticky.css">
3) Tạo hàm javascript hiển thị tooltip:

function showtooltip(trangxuly){
$('#sticky').html('<center>Loading...</center>');
$('#sticky').load(trangxuly);
}
4) Thêm thành phần có id là sticky vào trang HTML:

<div id="mystickytooltip" class="stickytooltip">
<div style="padding:5px">
<div id="sticky" style="width:350px; vertical-align:top; padding:0"><center><img src='/image/loading.gif'></center></div>
</div>
</div>

5) Gắn thuộc tính:
<a data-tooltip='sticky' onMouseOver='showtooltip("tinchitiet.php")'>Xem thông tin chi tiết</a>

Sunday, May 12, 2013

Insert a group of data rows into table by Zend

fetchAssoc(): returns data in an array of associative arrays, using the first column as the array index. Example, import a group of rows into another table:
$data=$this->DB->fetchAssoc("SELECT MSSV, HoTen FROM sinhvien WHERE KhoaHoc=3");
foreach($data as $key=>$value){
$d=array(
 
  'MaSo'=>$value['MSSV'],
 
  'Ten'=>$value['HoTen']);
 
$this->DB->insert('thisinh',$d);
}
Another example:
print_r($db->fetchAll('select col1, col2 from table'));
Array
(
    [0] => Array
        (
            [col1] => 1
            [col2] => 2
        )
)

Saturday, May 11, 2013

Hiển thị webcam và lưu ảnh về web server

Tut này sẽ hướng dẫn bạn các bước để hiển thị webcam trên web, sau đó lưu hình ảnh trên webcam về server có hỗ trợ PHP.
1. Download toàn gói demo tại đây, gói này gồm:
  • Thư mục jscam: chứa các file cần thiết nhất về hiển thị webcam.
  • File luuhinh.php: chứa hàm lưu hình ảnh về server.
  • File jquery.min.js: thư viện jQuery (nếu bạn có rồi thì thôi!).
  • File vidu.htm: code minh họa.
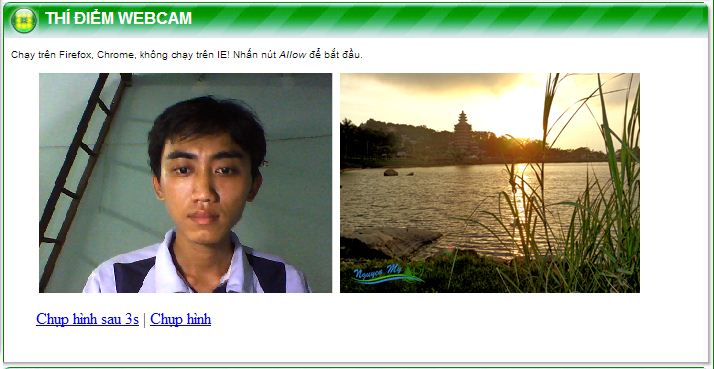
2. Giải nén gói demo trên vào nơi nào đó trong webroot. Sau đó chạy thử file vidu.htm để kiểm chứng. Kết quả như hình sau (demo online: http://nguyenmy.info/it/):
-------
Sau đây tui sẽ mô tả sơ lược về file vidu.htm:
  • File này sẽ có 2 dòng nhúng thư viện jscam và jquery (phải nhúng cả 2 thư viện vì trong jscam có dùng các hàm của jQuery):
<script src="jquery.min.js"></script>
<script type="text/javascript" src="jscam/jquery.webcam.min.js"></script>
  • Các thành phần HTML bắt buộc phải có và đặt đúng tên:
id="status": nơi hiện trạng thái của webcam (trong file ví dụ đã cho ẩn dòng này!).
id="webcam": nơi hiện webcam.
id="canvas" (đầy đủ là <canvas id="canvas" height="220" width="300"></canvas>): nơi hiện ảnh được chụp (cũng là ảnh sẽ được gửi về server).
  • Các hàm Javascript:
    • sifucam("#webcam", "canvas", "jscam"): khởi động webcam cho hiển thị ở #webcam, hình chụp cho hiển thị ở canvas, và đường dẫn tới thư mục jscam.
    • webcam.capture([n]): chụp ảnh từ webcam và vẽ lại bên canvas sau khoảng thời gian n giây (nếu n bị bỏ trống nghĩa là chụp liền).
    • sifucanvas('canvas', 'luuanh.php'): submit hình ảnh trong canvas về file luuanh.php để thực hiện lưu.
Để thực hiện được demo này, tác giả có kế thừa gói thư viện jscam và jquery của người khác (nước ngoài) để sửa chữa lại cho phù hợp.
Chúc các bạn thành công!
Nguyễn Mỹ

Friday, May 10, 2013

Gửi Gmail bằng PHP

Hướng dẫn sau sẽ giúp các bạn thực hiện viết code gửi mail với PHP. Dựa trên nền tảng lớp PHPMailer (của người ta), sf đã tổng quát hóa thành 2 hàm là SifuHeader() và SifuMail() để việc viết code đơn giản hơn.  Các bước thực hiện như sau:
1. Download 2 file class.phpmailer.phpclass.smtp.php  tại đây.
2. Mở php.ini và uncomment (xóa dấu ; ở đầu) dòng sau:
extension=php_openssl.dll
3. Trong file php mà bạn muốn thực hiện viết code gửi mail, thêm dòng sau để nhúng lớp PHPMailer vào (chú ý sửa lại đường dẫn cho phù hợp):
include("class.phpmailer.php");
4. Khai báo 1 đối tượng $mail thuộc lớp PHPMailer:
$mail = new PHPMailer();
5. Dùng hàm SifuHeader để khai báo username và password mà bạn dùng đăng nhập Gmail:
$mail->SifuHeader("sifu@gmail.com","matkhau");
6. Dùng hàm SifuMail để tạo và gửi mail. Cú pháp hàm này như sau:
SifuMail($ten_nguoigui, $mail_nguoinhan, $tieude, $noidung, $file_dinhkem=null);
    Hàm SifuMail sẽ trả về 1 chuỗi (string) cho biết email được gửi thành công chưa, và gửi đến đâu. Sau đây, chúng ta xem xét 3 ví dụ với hàm SifuMail:
  • VD1: Gửi mail đến abc@gmail.com, không đính kèm file:
SifuMail("Nguyen Ngoc My","abc@gmail.com","Email thu nghiem","Hello World!");
  • VD2: Gửi mail đến abc@gmail.com và def@gmail.com, đính kèm file hinhanh.jpg:
SifuMail("Nguyen Ngoc My",array("abc@gmail.com","def@gmail.com"),"Email thu nghiem dinh kem 1 file","Hello World!","hinhanh.jpg");
  • VD3: Gửi mail đến abc@gmail.com và def@gmail.com, đính kèm file sf.jpg và ag.jpg:
SifuMail("Nguyen Ngoc My",array("abc@gmail.com","def@gmail.com"),"Email thu nghiem","Hello World!",array("sf.jpg","ag.jpg"));
Chúc các bạn thành công!
Nguyễn Mỹ